Category: Good to Know

Midwayfair’s Listening notes on diodes

I wanted to archive this for later reference. This was taken from a post on Madbean’s forum by Jon (Midwayfair)

Note that I have included notes of some diodes that I’m not selling (and some that you won’t be buying, like 1N914s and other 10c diodes). I included them for sound comparisons, and because they are diodes many people here will be familiar with.

Due to extremely limited stock on some of these, I may not be able to honor all requests for trios. I am working on getting more of some of the great sounding ones.

Please check the data sheets for Fv characteristics. Fv does not, however, tell the whole story, and several diodes in the same clipping range sound similar.

Continue reading

Allen Bradley Resistors

ab_logomm abres


I am trying to get some info together on these old carbon composite resistors. I would like to start making some boards in Eagle CAD that will use these parts so I will need to alter the resistor catalog parts a bit to compensate for the larger body sizes. I mainly want to use the 1/4 – 1 watt capacitors for pedals and saving the 1 – 2 watt for tube amps. More into to come soon.

Trying out some new strings

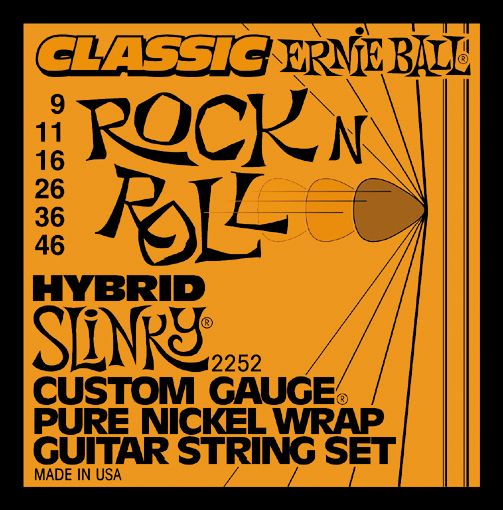
I have been looking for some nice fatter strings that have a great low end and still have the ability to pull off bends on the higher end. I love the sound of 10’s and 11’s but find it hard to pull off any bends without killing the fingers. I started looking at the Ernie Ball Hybrid series and found these.

Gauges:

  • 2255 Extra Slinky 8-11-14-22-30-38
  • 2253 Super Slinky 9-11-16-24-32-42
  • 2252 Hybrid Slinky 9-11-16-26-36-46
  • 2251 Regular Slinky 10-13-17-26-36-46
  • 2250 Power Slinky 11-14-18p-28-38-48

So as you can see from above that the Hybrids are the best of both worlds.

How to test a buffer

Found this useful when testing buffer circuits like the Klon buffer or the Cornish buffer. This was taken from DIYSP.

You could stick a small capacitor (470pF) in parallel with the output signal. That would simulate an extra 5m of cable or so. Then try the same thing without the buffer and see the difference.

Bear Hug Compressor

I am working on a Bear Hug Compressor by  Jon Patton for my Aunt. I was just about to box it up when I was finished testing it when I noticed it may be a little to subtle. I not sure how it is supposed to sound and compressors have got to be the hardest pedal to “test”. I ran across some tips that Jon posted over at Madbeanpedals forums.

You can verify if it’s working properly by probing the resistance between the source of Q3 and ground at idle and when it’s playing with the comp knob at max. It should jump up from ~300 Ohms to somewhere between 1K and 2K when playing, maybe higher on a hard strum. If not, then I have some suggestions.
Keep in mind that with a fast attack and recovery, it’s going to sound subtle pretty much no matter what. It was designed to prevent volume spikes and boost the signal, rather than for all-out squash or sustaining. However, the gain drop is pretty significant in practice at max compression (for comparison, it’s like turning the boost pot on a Thunderpuss halfway down and then back up again really quickly), even though it’s hard to hear it working.

He also states that his voltages on the transistors are as follows

Q1 is D: 7.8v, G: 2.8v, S: 2v
Q2 is C: 7.8v, B: 1.04v, E: .5v

So I need to get checking and see if this is first “working” and if its going to be to subtle for my Aunt.

NI Maschine Default Pad Layout

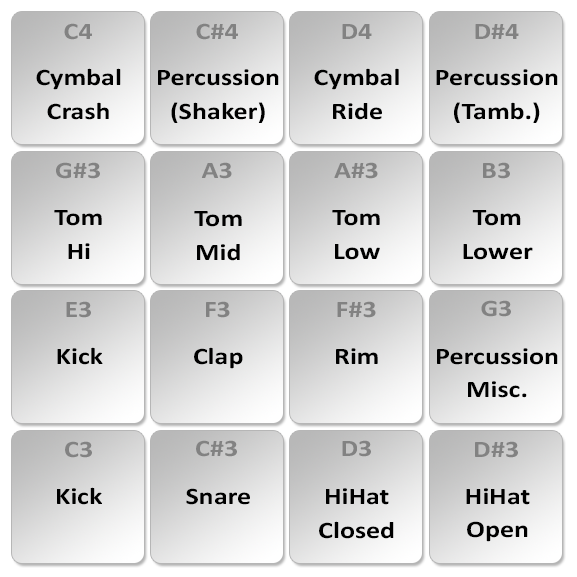
I wanted to layout some kits to have on hand of the standard drum machines and a few vinyl chops that I like using. What I have found with the Native Instruments kits is that when I lay a beat down I am able to switch kits and still have the kick and snare properly mapped out. The reason for this is that Native Instruments has a “default” layout of sounds to make up a kit. Not all drum kits follow this rule but I would say 90% of them do. Here is a basic layout that I made in Photoshop to show the default layout.

Maschine16Pads


I will make a kit as an example and upload it here later this week.

Things I have learned along the way..thus far

I found a thread at FSB that was a list of “things I have learned along the way” and I found some really great information that I always seem to have to look up. I wanted to make a note of it so I can look it up as needed.

  • A clean, properly tinned tip equals a hot tip & also super easy, neat soldering
  • For NPN try 2n5088, for PNP try 2n3906 – With a few notable exceptions those transistors will work for most things, you don’t need to pay a fortune for weird out of production transistors.  If you socket the transistors yo7u can always swap them if you need to later.
  • Two resistors of the same value in series doubles. Two resistors of the same value in parallel halves.
  • Two capacitors of the same value in series halves. Two capacitors of the same value in parallel doubles.
  • Never box before you’ve played the circuit (Rock it before you box it!)
  • Use sockets for transistors and sometimes diodes. Means you can experiment with different values and also avoid frying components when soldering.
  • 5/16″ is better for pots, and 3/8″ for jack sockets.

More to come…

Updated Etching process

I wanted to share my current process for etching a PCB from scratch. Here is a list of supplies I used in this tutorial.

Items I needed:

  • Copper clad board (I use 1oz copper 030 thinkness, This might be to thin by some standards but it works well for me. I like to trim/cut my boards with household scisors.)
  • Laser Printer (HP LaserJet Pro P1102w with ePrint)
  • HP Glossy Presentation Paper (Office Depot/Max $6.99)
  • House hold iron (I use a Black & Decker household cloths iron)
  • Ferric chloride solution (You can get a bottle from Radio Shack that should last for  10-15 smaller PCBs)
  • Plastic containers with lids (Rubbermaid sandwich containers)
  • Drill Press or something of the like

Continue reading

4Site Enclosure Sizes

4Site 125B
W 2.6″ X L 4.77″ X H 1.39″

4Site 1032L
W 3.68″ X L 4.67″ X H 1.95″

4Site 1590A
W 1.52″ X L 3.64″ X H 1.06″

4Site 1590B
W 2.34″ X L 4.39″ X H 1.06″

4Site 1590BB
W 3.68″ X L 4.67″ X H 1.18″

4Site 1590BBT
W 3.68″ X L 4.67″ X H 1.95″

4Site 1590DD
W 4.7″ X L 7.38″ X H 1.3″